Premium Membership Editing Resources

Are you focused on improving your pet photography editing skills?
We firmly believe editing your images is an important part of the process of creating amazing pet photography.
Our Premium Membership includes access to a range of editing-related resources created by Charlotte Reeves and Craig Turner-Bullock, all in a searchable central location!
And best of all, it's updated frequently! We release a brand new Unleashed Edits whenever we have something new to share, and a new Editing Toolbox video every Friday.
Join the Premium Membership to access everything below!
Join the Premium MembershipBeginner Unleashed Edits
Kara's Autumn Forest Run
The perfect action superstar, Kara obligingly ran towards us along this forest path, flanked by trees showing their best autumn colours.
Due to the shady lighting, the auto white balance has rendered the scene quite cool, and Kara’s black and white colouring needs some work to bring out the detail.
White balance alone is not enough to address this, so in this edit I’ll use both global adjustments and masks to bring this autumn action shot to life!
Instructor: Charlotte Reeves
Video length: 23 minutes
Software: Lightroom
Sakinah in the Tussocks
In this image, gorgeous Sakinah was sitting in the tussocks bathed in warm light. However, the raw file is a little flat and lifeless.
In this beginner focussed edit, Craig will be guiding you through using Lightroom’s basic adjustments and more to bring some life back to the image.
Instructor: Craig Turner-Bullock
Video length: 22 minutes
Software: Lightroom
Fletcher's Twilight Action Shot
Fletcher’s joyful expression was captured in this action shot, taken at twilight just after sunset.
The RAW file looks a bit flat and colourless though, so it needs some work in Lightroom to bring out the pastel sky tones and enhance the contrast in the subject.
Watch as Charlotte brings the image to life by enhancing the sky, removing distractions and improving the quality of the image using Topaz DeNoise AI.
Instructor: Charlotte Reeves
Video length: 38 minutes
Software: Lightroom, Photoshop, and Topaz
Tabasco's Fiery Sunrise Shot
Photographing with backlight, especially when it’s not filtered through trees, can sometimes lead to too much light spilling onto a dogs face, which is exactly what happened to this shot of Tabasco.
In this edit, Craig will show you how to fix that in Photoshop, along with the full process of editing to bring out the massive amount of detail in a medium format image file.
Instructor: Craig Turner-Bullock
Video length: 23 minutes
Software: Lightroom and Photoshop
Odie in the Rain
Odie was one of the wonderful dog models at a recent workshop, and right near the end of the shoot, Charlotte grabbed this shot of him amongst the yellow flowering gorse bushes while it was lightly raining.
Cloudy conditions made the light very flat, but for the edit, she wanted to accentuate the yellow of the flowers by warming up the background and painting with light to draw attention to Odie’s expression. In this edit, you’ll see just how easy it is to create a mood and enhance an image with flat lighting, just by doing a little painting with light in Lightroom.
Instructor: Charlotte Reeves
Video length: 24 minutes
Software: Lightroom Focused
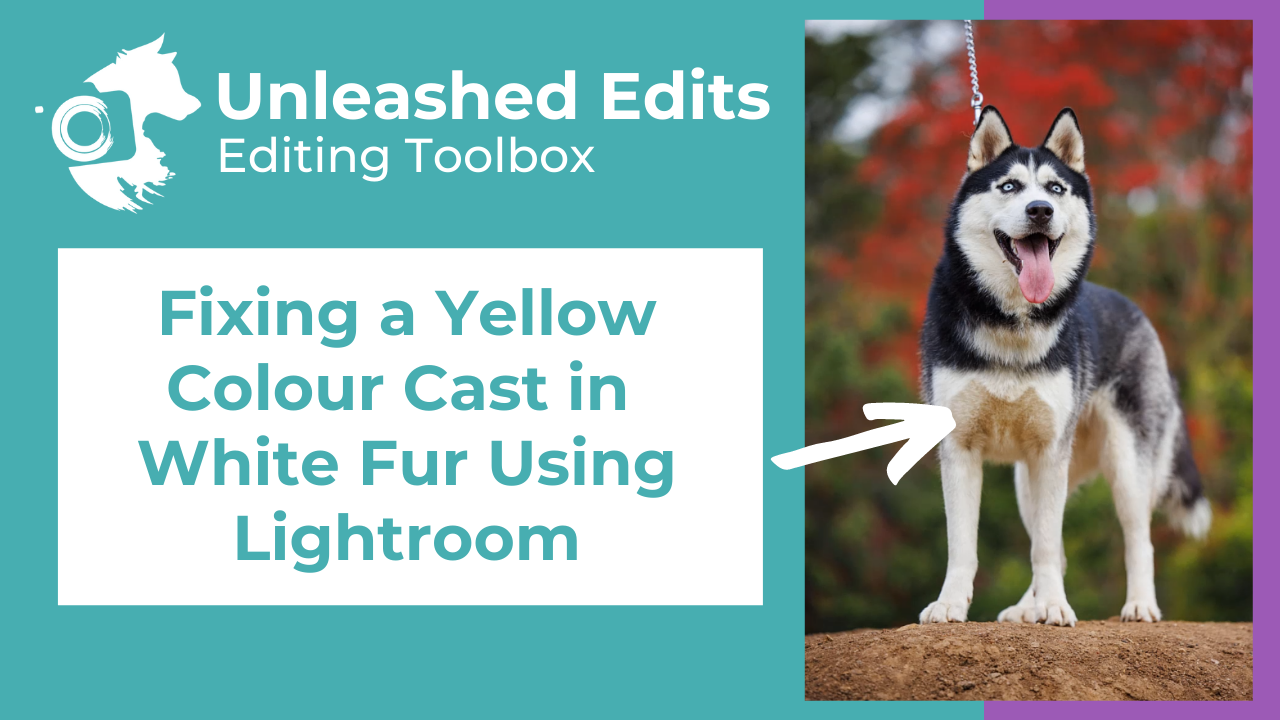
White Dog Secrets
White dogs are lots of fun to photograph because they stand out so well in their surroundings. One thing that you absolutely must get right though is making sure they actually look white.
Sounds simple, right? But often in pet photography you see white dogs looking various shades of grey, or with obvious colour casts like blue, yellow or pink. In this tutorial I’m sharing some simple techniques in both Lightroom and Photoshop, for making white dogs look properly white.
Instructor: Charlotte Reeves
Video length: 25 minutes
Software: Lightroom and Photoshop
Cesar's Hilltop Howl
This shot was taken during an intense golden sunset, but the RAW file lacks any of that colour and feeling and looks flat and cool.
In this edit, Craig will bring the life and colour back into the image, and walk you through his process for editing any elements that distract from the focal point of the image; Cesar howling.
Instructor: Craig Turner-Bullock
Video length: 18 minutes
Software: Lightroom and Photoshop
Enzo's Background Extension
Don't you hate it when the shot with the best expression of your doggy subject also has the worst framing? You’ve often been so focused on getting the dog’s attention so you can get that all-important eye contact, your framing suffers and you have gone a little tight on the subject on one side.
The good news is, if you’ve been taking a bunch of photos in close succession with slightly different framing, you can use the technique in this tutorial to save the day, with a little help from one very handy feature of Photoshop.
Instructor: Charlotte Reeves
Video length: 18 minutes
Software: Lightroom and Photoshop
Charlie Through Autumn Leaves
This dramatic image has a deceptively easy technique behind its creation, and in the tutorial, Craig spills the beans on exactly how it was shot to create this effect.
As simple as it was, the resulting image still needed some tweaks to colour, tone and content to accentuate the drama and improve the colour harmony.
Instructor: Craig Turner-Bullock
Video length: 11 minutes
Software: Photoshop Focused
Intermediate Unleashed Edits
Benson at the Orchard
Benson sat perfectly in the middle of this autumnal orchard row during our Unleashed Workshop in Arrowtown.
His position is crying out for a centered composition, but the image is a little tight, Thankfully Craig has another frame he can use to add space.
As with all RAW files, this is really lacking in colour, which was really vibrant on the day, so Craig also needs to use some colour adjustment tools to bring out the yellows and golds of autumn and really enhance the complementary colour harmony in the image.
Instructor: Craig Turner-Bullock
Video length: 22 minutes
Software: Lightroom and Photoshop
Layla in Purple
Chocolate brown Layla looks gorgeous staring up from that carpet of purple blossoms. The symmetry is nearly perfect and the focus is perfectly on those pretty eyes.
But there’s a couple of problems. Where has all the colour gone? And what can we do about that obnoxiously bright tag and collar?
The good news is, all the colour is still there lurking in the RAW file, just waiting to be extracted. And Charlotte also has a great Photoshop technique to share to help with the collar and tag. Problems fixed!
Instructor: Charlotte Reeves
Video length: 35 minutes
Software: Lightroom and Photoshop, and Topaz
Grimm's Urban Adventure
Border Collie puppy Grimm had his session in Christchurch’s CBD. It was a cloudy day which meant the light was soft and I could shoot in any direction to make the most of the urban backdrop.
This edit focuses on bringing contrast and a little added drama to an otherwise flat scene.
Watch as Craig works through several stages in both Lightroom and Photoshop to add shape and contour Grimm making him really pop against this monochromatic background.
Instructor: Craig Turner-Bullock
Video length: 29 minutes
Software: Lightroom and Photoshop
Maggie's New Brother, Billy
Billy and Maggie’s session amongst the wide-open, dramatic scenery of the hills above Christchurch was a first for Billy. Maggie is no stranger to Craig's camera lens though. The session was celebrating the arrival of her new baby brother. Because of the wide open space, the livestock all around us, and at Billy’s young age, they remained on leash for the whole session.
In this edit, Craig will show you how he enhances the drama of the sky, and deal with those leashes, as well as share some techniques in Lightroom and Photoshop that will be a great addition to your workflow as finishing touches.
Instructor: Craig Turner-Bullock
Video length: 33 minutes
Software: Lightroom and Photoshop
Noodle's Black and White Edit
This shot of Noodle was taken on a rather overcast day, and while the light is fairly flat and not very dynamic, it does have some good aspects that make it ideal for a black and white conversion.
But what’s the best way to convert an image to black and white, without it looking flat? There’s a few different ways it can be done in both Lightroom and Photoshop.
In this edit you’ll learn what makes a good candidate for a black and white conversion, best practices for how to actually convert the image to greyscale in Lightroom - plus what to do with the image to create some drama after you’ve converted it!
Instructor: Charlotte Reeves
Video length: 32 minutes
Software: Lightroom and Photoshop
Molly's Autumn Leaf Pile
Craig was photographing Molly at a less than ideal time of day, with a short window of time to capture the images he needed.
This has meant the light on her isn't perfect, and there is some work to do on the composition and removing the leash. In this tutorial he’ll be showing you how to retain detail in bright highlights, sharing tips for cropping and composition, showing you how to paint with light and much more to make this image the best it can be.
Instructor: Craig Turner-Bullock
Video length: 25 minutes
Software: Lightroom and Photoshop
Lenny & Marley's Simple Composite
During this shoot with Lenny and Marley, it proved quite difficult to get both dogs to stop for long enough at the same time to create a portrait of them together. So Craig shot individual portraits in roughly the same spot, knowing he would be able to composite them together in the editing stage.
In this edit, you’ll learn how to create simple, realistic composite images, With tips on how to shoot for compositing as well as the process of scaling the images and putting them together in a believable way.
Instructor: Craig Turner-Bullock
Video length: 38 minutes
Software: Lightroom, Photoshop, and Topaz
Opal's Storm Girl Edit
Something a little different from my usual sunlit style, this mini shoot with Charlotte's special little lady Opal took place one stormy afternoon on a rocky headland by the sea. She loves the limited colour palette and stormy tones created by the sky, water and rocks, but there’s quite a few elements in the image and it needed some work to bring attention to Opal, minimise distractions and enhance the light.
In this edit, Charlotte will use Lightroom’s masks to create the mood and selectively edit various parts of the image differently. Then it’s into Photoshop for the finishing touches including a virtual bath for Opal! Wishing it were this easy in real life.
Instructor: Charlotte Reeves
Video length: 37 minutes
Software: Lightroom and Photoshop
Maggie's Blissful Blossoms
Maggie’s expression is everything in this image. In this edit, Craig makes sure her blissful look is the focus with the yellow broome flowers playing a supporting role. He loves that gorgeous yellow backdrop, but there are a lot of elements that pull his attention and distract him from Maggie, so this image needs a lot of cleaning up and some selective adjustments to help direct the eye.
In this edit, Craig will mostly be using a variety of techniques in photoshop to deal with the issues mentioned and bring out the emotion in Maggie’s portrait.
Instructor: Craig Turner-Bullock
Video length: 40 minutes
Software: Lightroom, Photoshop, and Topaz
Beautiful Black Jessie
Black dogs are often seen as the most difficult colour of dog to photograph, and for a good reason. They need to be lit well when photographing them, with clean plentiful light. And when it comes to editing, there’s three very important things you need to keep in mind to make them look beautiful, shiny, clean and black!
In this edit, Charlotte shares exactly what you need to do to make black dogs look great, along with a bunch of other helpful tips for working with Masks in Lightroom. You also get to download her Sparkle Eyes Photoshop Action to install and use in your own edits!
Instructor: Charlotte Reeves
Video length: 26 minutes
Software: Lightroom and Photoshop
Roley's Frosty Forest Shot
Photographing cats on location is quite different from working with dogs. Take a look behind the scenes of Roley the Maine Coon’s frosty morning photoshoot before diving into Craig’s edit of his favourite shot from the session.
This edit will show you how to remove a leash and harness, how to enhance feline features as well as how to highlight some features of the location, without them overpowering the subject and taking all the attention.
Instructor: Craig Turner-Bullock
Video length: 36 minutes
Software: Lightroom and Photoshop
Charlie's 2 - Way Edit
Want to discover the power of RAW files? Then look no further!
In this tutorial, Craig edits one image in two completely different ways. Even though it was exposed as a silhouette, you’ll be amazed at how much detail can be recovered to result in an image full of detail. There’s plenty more to get stuck into from selectively colouring parts of an image, enhancing skies and adding a little extra colour harmony and a lot more!
Instructor: Craig Turner-Bullock
Video length: 27 minutes
Software: Lightroom and Photoshop
Daisy in Boston
Join Craig as he edits a shot of a Boston Terrier in Boston!
Photographing dogs in natural light during the blue hour is difficult, see how 1 small light source can make a difference, and watch as Craig brings up the exposure and detail lurking in the raw file, adds to the canvas, corrects perspective distortion and reduces noise using Topaz for the first time!
Instructor: Craig Turner-Bullock
Video length: 22 minutes
Software: Lightroom, Photoshop, and Topaz
Masking Angel
Photographing your subject against the sky can give you real challenges when it comes to exposure. Often you have to choose whether to expose for the subject, or expose for the sky. But what if there's another solution?
Editing the sky and the subject independently then combining the two is a good solution, but it relies on following two golden rules, to make it look believable - the most important of them being accurate masking. In this tutorial, learn how to mask the subject using two different methods.
Instructor: Charlotte Reeves
Video length: 25 minutes
Software: Lightroom and Photoshop
Evie & Monty Making Friends
What do you do when your client has a dream shot in mind, but you just can’t quite nail it at the session? You make magic happen in Photoshop of course! Providing you have the elements you need to make it all work that is.
In this video, Craig will take you through a basic composite, blending two images into one dream image that encapsulates the friendship between two best friends.
Instructor: Craig Turner-Bullock
Video length: 19 minutes
Software: Photoshop-focused
Uncurling Dunbar's Lip
We’ve all got great shots that would be perfect if it wasn’t for an eye closed, an ear flipped over or a lip curled up at some point in time.
The latter was the case with the image in his video. Can you fix that? Yes, and Craig will show you how. But that’s not all in this video, along with a look behind the scenes, Craig will guide you through the process of editing this shot in Lightroom. Combining multiple images into a multi-shot panorama, how to easily remove an owner and why it’s worth spending time on the finer details and finishing touches.
Instructor: Craig Turner-Bullock
Video length: 18 minutes
Software: Lightroom and Photoshop
Opal's Colouriffic Photo
Urban style shoots can be a great way of incorporating colours and textures not found in nature. But what do you do when the colour isn't quite the right shade and hue you pictured? Instead of applying global adjustments that mess with the colours in other areas of the image, we look into some techniques for selecting and adjusting selected colours only.
What better way to demonstrate these techniques, than while editing an urban Unleashed Education colour-themed shot of Charlotte's special little lady, Opal the Aussie!
Instructor: Charlotte Reeves
Video length: 28 minutes
Software: Photoshop-focused

Creating a Panorama
Panoramic shots are the perfect way to showcase dogs in their favourite places and in this video Craig will show you how he does it!
Everything from why bother with making panoramas, tips for photographing panoramic images and how to put them together seamlessly.
Instructor: Craig Turner-Bullock
Video length: 23 minutes
Software: Photoshop-focused
Advanced Unleashed Edits
Ralph Sees in the New Year
Ralph was photographed at the beach during the first sunrise of 2023.
It does have a few issues to fix. Revealing the texture in Ralph’s fur showed his face has some flare over it. This is also a high contrast scene, so it needs a bit of work to pull out all the detail in Ralph and the sky.
Watch as Craig addresses these problems and shares some great tips for noise reduction and sharpening in Topaz to bring colour harmony to the finished edit.
Instructor: Craig Turner-Bullock
Video length: 30 minutes
Software: Lightroom, Photoshop, and Topaz
Keilah's Morning Seascape
At Keilah’s morning beach session, the dark clouds eventually parted and out peeked the sun. With both bright sun and dark shadows, the dynamic range of the scene was very high, which meant that the image needed to be underexposed to try and capture all the tones. The white balance is also much cooler than it should be.
Watch and learn as Charlotte brightens and warms the image in both Lightroom and Photoshop, gradually building up the adjustments to give a subtly warm and bright seaside portrait with a beautiful soft feel.
Instructor: Charlotte Reeves
Video length: 43 minutes
Software: Lightroom, Photoshop, and Topaz
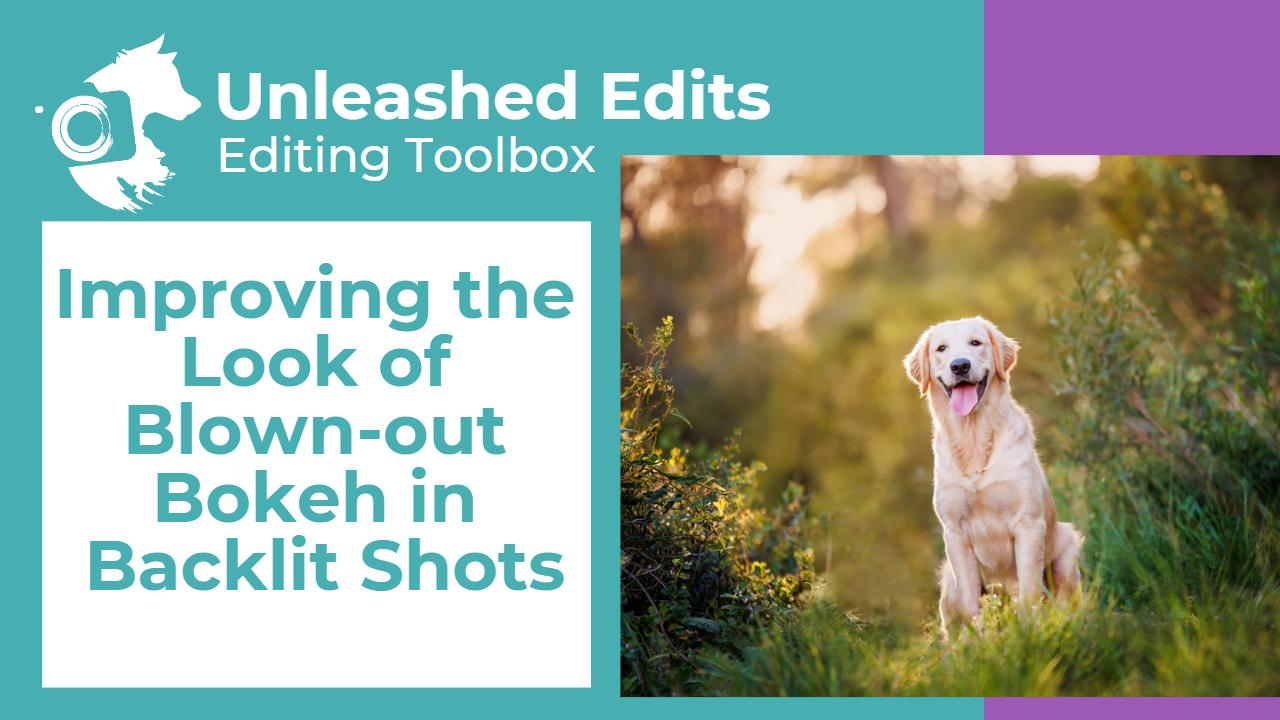
Oliver in Spain
Oliver was photographed in Spain during our Barkelona workshop, posing beautifully on a bench next to a forest pathway.
But the lighting definitely wasn’t ideal! The backlight was very strong and the bokeh ended up blown-out. There was also not much light on the front side of Oliver.
Watch as Charlotte addresses the lighting issues with a creative way to improve the bokeh. She also shares a great technique for enhancing fur detail when the image is noisy and degraded from heavy editing.
Instructor: Charlotte Reeves
Video length: 37 minutes
Software: Lightroom, Photoshop, and Topaz
Winter Bonus
Taken in super cloudy conditions in winter, this forest portrait of Bonus the Border Collie was crying out for some special treatment.
The colour palette in the image wasn’t really doing it any favours and the composition just didn’t feel balanced.
Follow along with the process of crafting this into a well composed winter forest portrait with a desaturated mood and tonnes of foggy ambience.
Instructor: Charlotte Reeves
Video length: 37 minutes
Software: Lightroom and Photoshop
Loki's Lakeside Horizon Shift
This shot of Loki was taken on a very frosty winters morning and the lakeside location proved difficult to get the perfect angle. This meant Loki’s head/eyes ended up intersecting with the horizon.
So what’s the best way to deal with that after the shot has been taken? Well by moving the horizon of course!
In this edit you’ll learn how to move the horizon line so it isn’t intersecting a dogs head. Along with tips for removing distractions, extending the image, enhancing the misting morning anbd much more!
Instructor: Craig Turner-Bullock
Video length: 31 minutes
Software: Lightroom, Photoshop, and Topaz
Zephyr's Low Key Portrait
Zephyr was photographed during our very first Style Lab Workshop. This tunnel of trees right next to the lake provided the perfect location for backlighting and for creating a moody but warm low key image.
Captured very early in the morning, the light was warm, but low, so the ISO is high In the edit we deal with the resulting noise and quality issues using tools in both Lightroom and Photoshop.
The colour palette is minimised to create a simple low key feel, then the pose of the dog and composition helps to guide the light distribution and final crop.
Instructor: Charlotte Reeves
Video length: 32 minutes
Software: Lightroom and Photoshop
Benson's Winter Wonderland
It’s time to get creative with this snowy scene. The dark sky gives the image the perfect mood to add in something completely new, snow!
Craig will show you how to create snow from scratch and explain why it works for this particular shot.
There’s much more than this in this video though as Craig guides you through the full edit from an underexposed RAW file to Benson’s living his Winter Wonderland fantasy!
Instructor: Craig Turner-Bullock
Video length: 26 minutes
Software: Lightroom and Photoshop
June's Pastelicious Action Shot
Twilight is a beautiful time of day to shoot, but what you end up with in-camera rarely captures those beautiful pastel tones you see in real life.
All those pastel colours and subtle tones are lurking in the RAW file though - you just need to know what edits to make to bring them out!
In this comprehensive tutorial, Charlotte transforms a flat, dark and cool twilight action shot into a crisp, colourful explosion of white fur, pastel colours and splashy beach fun!
Instructor: Charlotte Reeves
Video length: 26 minutes
Software: Lightroom and Photoshop
Fixing Cleo's Collar
One of the most common editing tasks we do as pet photographers is leash removal, but what happens when the position of the collar and neck appearance is a dead giveaway that there was a leash involved? If it’s a full client session, it might not make sense to just remove the collar entirely - so the collar may need to be reshaped or shifted for a more realistic appearance.
In this comprehensive tutorial, follow along as Charlotte completely reshapes and moves Cleo’s collar using a variety of techniques and tools in Photoshop. The finished result will blow your mind!
Instructor: Charlotte Reeves
Video length: 35 minutes
Software: Photoshop Focused
Bijou's Moody Edit
The light, composition and pose of Bijou in this semi-candid portrait was just begging for a dramatic and moody edit.
But with this backlit image so cool and flat, it really needed some work to correct the white balance and bring back some contrast to the background and the subject.
Lightroom’s new masking tools made this process much easier, allowing precise selections and edits that could be applied selectively to the image. A few tricks in Photoshop helped to complete the edit, before a little more local tweaking after the crop in Lightroom.
Instructor: Charlotte Reeves
Video length: 34 minutes
Software: Lightroom and Photoshop
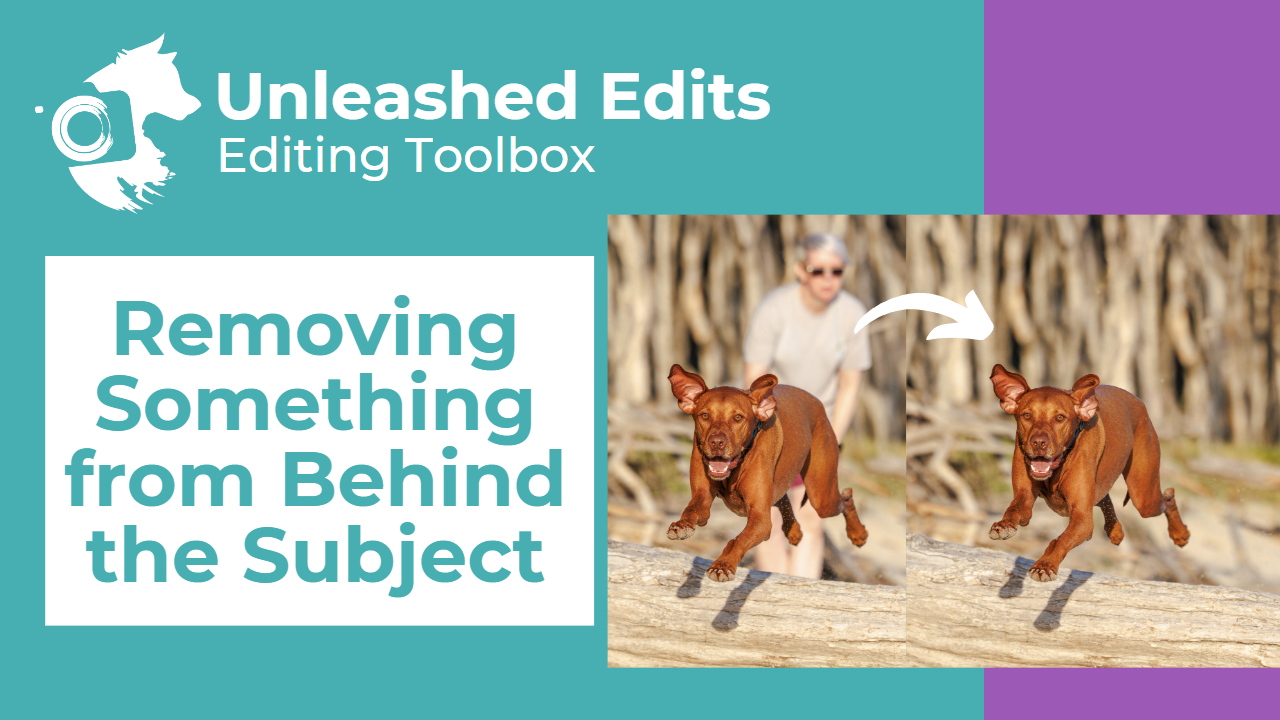
Poppy's Splashtacular Action Shot
Photographing dogs in action can result in some super cool images, but can also be random, messy and involve a little bit of luck!
You might also end up with an image where the action is perfect, but other aspects of the image need some extra work, like this shot of Poppy where her mum needs to be removed from the background.
This edit covers the process of removing Poppy’s mum from behind the splash - not an easy one and quite a few steps involved, but the end result is totally worth it!
Instructor: Charlotte Reeves
Video length: 30 minutes
Software: Photoshop Focused